Balthus Knot – How to tie a tie
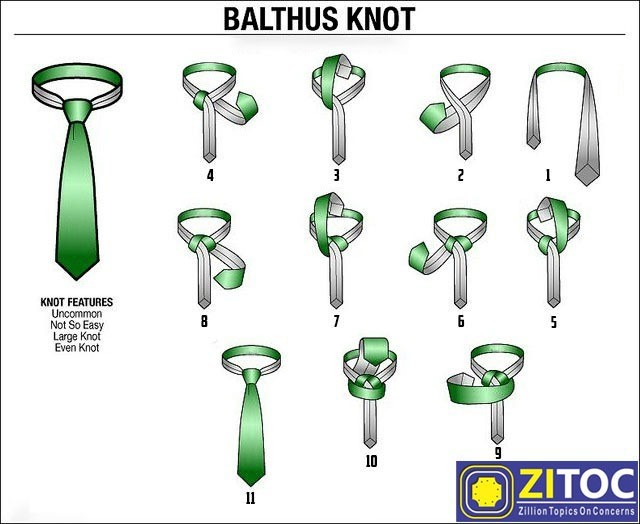
Balthus Knot: It is a good choice to wear if you want to stand out with confidence and want to send a strong message. It takes nine passes to complete. Because of the many loops, you should choose a tie with at least 57 inches long. It is symmetrical, large in size, and recommended with cutaway collars and spread collars. If you want to learn how to tie a tie, must learn the Balthus knot following the below-mentioned steps.
- Drape the neck tie
- Make an X-shape
- Bring the thick up and then down through the collar loop
- Repeat the step 3 this time on left side
- Tuck the tick end down
- Flip the thick end upward
- Bring the thick end down through the collar loop
- Make a horizontal band
- Bring the thick end up to the collar loop
- Bring the thick end down through the horizontal band
- Final adjustments
1- Drape the neck tie

With the seam facing upward, drape a long necktie around your collar in a way such that the thick end should be on your left side and should hang at least to mid-thigh and a thin end should end to the center of the chest.
2- Make an X-shape

Make an X-shape, cross the thin end of the tie over the thick end.
3- Bring the thick up and then down through the collar loop

Bring the thick end of the tie-up in front and tuck it down through the collar loop behind the thin end.
4- Repeat the step 3 this time on left side

Again bring the thick end up, this time on the left side.
5- Tuck the tick end down

Tuck the thick end down through the collar loop behind the thin end and leave to the right side.
6- Flip the thick end upward

Flip the thick end upward to the center of the collar loop.
7- Bring the thick end down through the collar loop

Bring the thick end all the way down behind the knot and let it emerge on the left side.
8- Make a horizontal band

Crossing from left to right, make a horizontal band on the front of the knot and slip your finger underneath the horizontal band.
9- Bring the thick end up to the collar loop

Bring the thick end up from behind the knot.
10- Bring the thick end down through the horizontal band

Coming through the collar loop, tuck the thick end into the newly created horizontal band.
11- Final adjustments

Finally, tight the knot gently set the tie to be fallen on your beltline.


